
Contents
General Information About Labra for Co-sell
Technical Features and Configurations
Labra Features and Future Developments
General Information About Labra for Co-sell
What is Labra for Co-sell and how does it work?
Labra for Co-sell is an application that is installed in our customer's Salesforce. It is designed to connect the opportunities and leads generated on Salesforce with ACE (APN Customer Engagements), which is AWS's CRM. This connection is bi-directional, meaning it automates the sharing of opportunities from Salesforce to ACE, and vice versa.
With Labra for Co-sell, the sales team can submit opportunities directly from Salesforce without having to enter AWS CRM. Similarly, opportunities that AWS shares with them will appear directly inside Salesforce, eliminating the need to log into the APN Portal.
The installation of Labra for Co-sell begins in the Sandbox or Dev environment of Salesforce, and later in the Production environment. During the Sandbox stage, it also connects with a Sandbox provided by AWS for testing and demonstrating the sync between them. This connection requires permissions from the AWS account.
How does Labra for Co-sell facilitate co-selling?
Labra facilitates co-selling by integrating sales databases from different companies, which allows for shared lead data. This process creates efficiencies and reduces double entry, ensuring that both sides are seeing the same data. This not only saves time but also builds a team atmosphere among the involved parties. An Account Manager from Labra leads the integration efforts until completion, ensuring that the lead generation processes of each company do not affect the quality of the data.
Onboarding and Setup
What is the process for onboarding the ACE program with Labra?
The onboarding process with Labra involves several steps. First, an Onboarding Resources page is prepared, which includes detailed information on how to operate OppSync, how to connect your CRM to the platform, create IAM Roles, and other important details. A tutorial on IAM Role creation is also included.
Access to an Onboarding Platform is provided, which includes a step-by-step guide to ensure successful onboarding. During the Onboarding kickoff call, the process of connecting Salesforce to AWS is initiated. The AWS Administrator is responsible for creating an IAM Role and providing the ARN associated with the account. The Alliance Lead connects the IAM Role to the APN Portal Self-Onboarding Tool.
The Salesforce Admin accesses the Sandbox environment and connects it to Labra OppSync. Once the team members involved in the process are identified, the onboarding process can be initiated.
What are the different steps involved before and during kick-off?
Before the first call, the user is required to:
- Decide an email account that will be used to manage OppSync.
- Create a Sandbox environment in Salesforce for testing the integration and invite oppsync_bot@oppsync.io as a user.
- Define the Salesperson who will be managing the CRM throughout the onboarding process.
- Define the AWS Expert who will create an IAM Role in Staging and Production environments during the kickoff call.
- Define the AWS PDM who will be kept in the loop throughout the onboarding process.
- Define the main point of contact who will drive the onboarding process from the user's side.
The steps involved in using the OppSync kick-off call include:
- Creating an OppSync account, for which an invitation will be sent via email.
- Creating an IAM Role with a Cloud Formation Link in staging and production environments.
- Configuring the OppSync Account.
- Connecting your CRM Sandbox to OppSync.
- Requesting an S3 Bucket Policy to the AWS team.
- Installing the Salesforce Packaging in your Sandbox environment.
How do I Generate IAM Policies during Cloud Settings?
Step-by-step for the integration:
- Please log in to your APN Portal.
- In another tab, open the ACE CRM Integration Tool.
- Press the button "Initiate Onboarding Request".
- Fill in the Basic Information section.
"What solution would you be using to integrate your CRM with APN?" > Third-Party Solution.
"Name of the third party solution provider" > Labra
On the Third Party contact, please add support@labra.io as the Third Party Lead.
The additional partner can be someone from your Company. - In the next section, paste the Staging IAM Role and the Production IAM Role.
- In "Data Backfill" section, select NO.
- Wait until the submission is completed.
- Go to My Integration, then Details.
- Copy the Sandbox Policy and the Production Policy and paste them on Labra under Submit IAM policies section for staging and production respectively.
- Kindly follow the below video tutorial on uploading both Policies to the IAM Roles previously created.
🚀 Click here for uploading the S3 Bucket Policy to your IAM Role.
How do I add an IAM role for Labra OppSync?
To add an IAM role for Labra OppSync, you can follow these steps:
- Log into your AWS Management Console.
- Navigate to the IAM (Identity and Access Management) service.
- Click on 'Roles' in the left-hand navigation pane.
- Click on 'Create role'.
- Select 'Another AWS account' for the Role Type.
- Provide the account ID for Labra OppSync and check the box for 'Require external ID'. Enter the external ID provided by Labra.
- Click 'Next' to set permissions. Attach the policies that Labra OppSync requires to function properly.
- Click 'Next' to add tags if necessary.
- Click 'Next' to review. Here, you can name your role (e.g., LabraOppSyncRole) and describe it.
- Click 'Create role'.
Once the role is created, you can provide the Role ARN to Labra OppSync. They will use this ARN to assume the role and perform actions on your behalf. Always ensure you're following the principle of least privilege when granting permissions.
How to do UAT in ACE sandbox with Labra OppSync?
To conduct User Acceptance Testing (UAT) in the ACE sandbox with Labra
OppSync, you would typically follow these steps:
-
Log into your ACE Sandbox environment: This is a separate environment
from your production ACE system, specifically designed for testing. -
Log into your Salesforce Sandbox environment: This is where Labra
OppSync is installed for testing. -
Create Test Opportunities in Salesforce: Generate a few opportunities with
different parameters to test various scenarios. This could include
opportunities that are expected to be accepted, rejected, and reviewed. -
Sync Opportunities to ACE using Labra OppSync: After creating the
opportunities in Salesforce, use Labra OppSync to sync these
opportunities to ACE. -
Check the Status Updates in Salesforce: After ACE processes the
opportunities, check if the acceptance statuses are updated correctly in
Salesforce through Labra OppSync. -
Update Opportunities in Salesforce and Sync to ACE: Accept and reject
opportunities and leads that have been submitted and update them in
Salesforce. Then, use Labra OppSync to sync these updates to ACE. -
Repeat the Process: The UAT process is often repetitive, done multiple
times to ensure all scenarios are tested. -
Record the Results: It's a good practice to record your screen while doing
the offline tests and then share the recordings with your team so they can
review them.
Remember, the goal of UAT is to ensure that the system can handle real-world
tasks and scenarios. If you encounter any issues during the UAT, report them to
the Labra OppSync team for resolution. Once the UAT is successful, you should
be ready to move to the production environment.
Salesforce Integration
What is the process to integrate Labra OppSync with Salesforce and ACE?
The integration process involves:
-
Initial Setup:
- Create an IAM Role in your AWS account with permissions for Labra to access ACE.
- Install the Labra OppSync managed package in Salesforce.
-
Configuration:
- Map Salesforce fields to ACE-required fields using the Labra OppSync configuration interface.
- Set up synchronization settings, including frequency and data direction (unidirectional or bidirectional).
-
Testing:
- Submit test opportunities to ensure data flows correctly between Salesforce and ACE.
- Verify field mappings, data accuracy, and workflow triggers.
-
Go-Live:
- Once testing is successful, deploy Labra OppSync to your production environment.
- Schedule regular syncs or use manual triggers as needed.
Who should be involved in the integration process?
A successful integration typically involves:
- CRM Administrator: Responsible for installing the managed package, configuring field mappings, and ensuring CRM readiness.
- AWS Administrator: Sets up the IAM Role and ensures ACE permissions are granted correctly.
- Labra Onboarding Specialist: Provides guidance and technical support throughout the process.
- Business Stakeholders: Define requirements, workflows, and success metrics for the integration.
How to Update Mandatory Fields for ISV Accelerate Partners (Salesforce)
As part of the recent updates to AWS's co-sell initiatives, ISV Accelerate Partners are required to fill out additional fields when setting a referral stage to "Launched" in Salesforce. This guide provides a step-by-step walkthrough to ensure your account settings are correctly updated and compliant with the new requirements under the SaaS Revenue Recognition Program (SRRP). Following these steps will enable the mandatory fields in the 'SaaS Documentation Details' section of the referral form.
- Open the 'App Launcher'.
- Search for "onboarding" and click on 'Labra Onboarding Quick Setup'.
Fig. 1 - Scroll down to 'AWS Specific Settings'.
- Check the “SaaS Revenue Recognition Program” box.
Fig. 2 - Ensure that the following boxes are also checked: “ISV Accelerate Program Partner”, “Technology Partner”, and "ISV”.
Fig. 3 - Click on 'Next' to save changes
Fig. 4
📒 Please note: Once this is updated, the new required fields from AWS will become mandatory in the 'SaaS Documentation Details' section of the referral form when setting the stage to 'Launched'.
Fig. 5
🚀 Learn more! For additional details and insights, visit the AWS article: Unlocking Synergies: Maximizing Co-Sell Opportunities with AWS.
HubSpot Integration
Outgoing Referrals – HubSpot Integration (Sandbox & Production)
How do sandbox and production differ when testing outgoing referrals?
-
Sandbox: Uses AWS-provided test users and does not display your actual solutions catalog. Only “Other” is available in the Solutions Offered picklist. Selecting “Other” will enable a required text field, Other Solution Offered. For testing, type “other” in this field.
- Production: Uses your real APN users (with ACE User/Manager roles) and your actual solutions catalog.
Do I need to set up test users in HubSpot?
-
Sandbox: Set the Opportunity Owner field to the AWS sandbox test user.
-
Production: Assign actual HubSpot users who have ACE access in APN.
Why are there both “Opportunity Owner” and “AWS Partner Central User” fields?
-
Opportunity Owner: Determines who owns the deal in HubSpot. Required for sandbox testing.
-
AWS Partner Central User: Maps to your APN user permissions in production. Critical when sending real opportunities to AWS.
Can I customize which fields sync from HubSpot to AWS?
-
Yes. Use Labra’s Mapping Manager to configure field mappings.
-
Make sure all required fields (Opportunity Owner, Solutions Offered, Other Solution Offered if applicable) are mapped correctly before submitting referrals.
What happens if I submit an opportunity with missing fields?
-
The submission will fail.
-
HubSpot will display an error message. Complete all required fields before submitting.
Can I test the full sync flow with AWS in sandbox?
-
No. Sandbox testing is limited to structural validation (required fields, sync process, mapping).
-
Full end-to-end sync with AWS is only possible in production.
What permissions are required for production sync?
-
Users must have ACE User or ACE Manager roles in APN.
-
This allows them to be selected as the Partner Central User when submitting referrals.
Incoming Referrals – HubSpot Integration
Do incoming referrals behave differently from outgoing referrals?
-
Yes. Incoming referrals must be accepted before they can be edited or synced further.
-
Outgoing referrals can be created and submitted directly, as long as required fields are completed.
HubSpot Sync Configuration (New Labra Mapping Manager)
Set Up Mapping Manager
What does the mapping manager do?
- Map HubSpot deal, company, and contact properties to AWS referral fields.
- Save different mapping templates for various deal types (e.g., new business, renewal, expansion).
- Automate population of referral form based on live HubSpot data.
What is a mapping template?
A mapping template is a reusable configuration that stores a set of field mappings between HubSpot and AWS referral fields. Each template can represent:
- A specific deal type (e.g., New Business, Renewal, Expansion)
- A specific AWS Partner Program (e.g., ISV Accelerate, WAFR)
Templates ensure consistency and speed when submitting similar types of referrals.
How do I create a template?
- Click “Create new template”.
- Enter a unique name (e.g., Renewal - ISV).
- Click Create to proceed to the field mapping screen.
Best practices: Use descriptive names (e.g., Net-New Business – WAFR), especially if your team will manage multiple templates.
Can I delete or edit a template later?
Yes, templates can be renamed, edited, duplicated, or deleted from the dropdown menu on the top bar.
What types of fields can be mapped?
You can map:
- Deal fields (e.g., deal stage, deal amount)
- Company fields (e.g., domain, industry)
- Contact fields (e.g., name, email)
Each field in the AWS referral form can be mapped to an appropriate HubSpot property where applicable. Click here for the full list of Labra Referral Fields in HubSpot: Customer, Referral, AWS, and Contact Details.
What happens if I leave a field unmapped?
Unmapped fields won’t be auto-filled. If an unmapped field is mandatory in the AWS referral form, you’ll need to manually enter it during submission. To minimize effort, we recommend mapping all required fields.
Can I map one HubSpot field to multiple referral fields?
No. Each HubSpot field can be mapped to only one referral field per template.
Do I need to fill in all the rows?
Not necessarily.
- Mandatory referral fields need to be mapped.
- Optional fields can be left blank, if they are not applicable.
- The more fields you map, the more seamless your referral submission becomes.
Who can create/edit templates?
Only users with Labra Admin access can manage templates.
Create Company and Contact in HubSpot
Company
Toggle ON to automatically create a company record in HubSpot using details from the referral.
Contact
Select the types of contacts you want Labra to create in HubSpot as hubspot contact record. These contacts are associated with the referral and can include:
- Customer end user contact
- AWS sales rep
- AWS account manager
- Partner development manager (PDM)
- AWS partner success manager
- AWS ISV success manager
- Other PDM
Tip: Enable only the roles relevant to your co-sell motion to avoid clutter and ensure better visibility of key stakeholders within HubSpot.
HubSpot Deal Pipeline for Incoming Referrals and Leads
Which HubSpot pipeline and stage should be chosen?
Assign dedicated pipelines and deal stages for incoming referrals and leads. This helps streamline reporting, prioritization, and follow-up processes. Be sure to align your selections with your team’s internal sales processes and lead management workflows for maximum effectiveness.
Can we use the same pipeline and deal stage for both leads and referrals?
Yes, you can use the same pipeline and deal stage for both leads and referrals. However, we recommend assigning separate pipelines or distinct deal stages if your team treats them differently. This helps ensure cleaner reporting, clearer segmentation, and more customized follow-up workflows. If you’re not currently receiving leads from AWS, you can leave the lead pipeline and stage fields unconfigured. You can always update the lead pipeline later and assign it accordingly at that time once you start receiving leads from AWS.
AWS Partner Central User Details
Who should be added here?
You should enter the details of users who have access to AWS Partner Central and will be using the Labra app in HubSpot. Each user should have at least ACE user or ACE manager access to AWS Partner Central.
What roles are required in AWS Partner Central?
Users must have a minimum role of ACE user or ACE manager in AWS Partner Central to ensure proper data syncing and integration with Labra.
Can I add multiple users?
Yes, you can click “Add another Partner Central user” to input additional users as needed.
What information do I need to provide for each user?
For each user, you'll need to enter:
- First Name
- Last Name
- Email address
Make sure the email matches the one they use in AWS Partner Central.
Can I delete a user entry?
Yes, simply click the trash icon next to a user’s entry to remove them from the list.
Where can I learn more about AWS Partner Central roles?
Click here to access AWS documentation about ACE user and ACE manager roles.
Update Referral Record Based on HubSpot Deal Changes
What happens when I toggle a field on?
When a field is toggled on, any change to that field in a HubSpot deal will be automatically reflected in the corresponding Labra referral record.
What if I toggle a field off?
The system will not sync any updates from that field. Any changes in the HubSpot field won’t affect the referral record for that field.
What does the “Map stages” button do?
It opens a stage mapping interface where you can define how HubSpot deal stages correspond to Labra referral stages.
Is this syncing one-way or two-way?
Syncing is one-way, from HubSpot to Labra. Changes in Labra won’t reflect back in HubSpot.
Do I need to set this up for each deal?
No. Once configured, this applies automatically to all referral records linked to HubSpot deals.
Will enabling all fields slow down my syncs?
Not at all. Labra handles real-time updates efficiently, regardless of how many fields are enabled.
What if I don’t use HubSpot deal stages?
If you don't use deal stages, simply leave that toggle off. The other fields can still be synced independently.
Sync referral record updates with HubSpot fields
What does enabling “Sync referral data” actually do?
It activates automatic updates from Labra to HubSpot for selected referral fields, such as referral stage, AWS reps, engagement scores, and other mapped data—keeping both systems in sync.
Which fields can be synced to HubSpot?
You can sync any referral data that you map in the interface, including:
- Referral stage
- AWS representatives
- Engagement scores
- Any custom fields you’ve added and mapped
Do I need to map every field?
No, not all fields, but mapping key fields can significantly support your sales process. We recommend starting with essential fields such as AWS Sales Rep, AWS Account Manager, Referral Stage, and AWS Internal Stage to ensure smoother tracking and better visibility.
Will syncing overwrite existing HubSpot data?
Yes, for the selected fields, Labra will push updates to HubSpot, which may overwrite existing values in those fields.
Can I preview or test the sync before enabling it?
While there’s no preview mode, you can safely toggle the feature on and test with one or two mapped fields before scaling up.
What happens if I skip the mapping step?
If no fields are mapped, no data will sync—even if the feature is toggled on. You must complete the mapping setup to enable syncing.
Can I disable syncing later?
Yes, you can toggle the “Sync referral data” switch off at any time to pause syncing.
Can I sync only selected fields?
Yes, you can choose which fields to sync by checking the “Sync to HubSpot” box for each field during the mapping process.
What does the 'A mapped field is required' checkbox do?
Checking this box marks the field as mandatory. If it’s not mapped or populated, the record may not sync.
How often does Labra sync with HubSpot?
Syncing occurs in real time when changes are made to the mapped referral fields by AWS or you in referral form.
Can I come back and change mappings later?
Absolutely. You can return to the “Map referral data” screen anytime to edit or update your field mappings.
How to Request Test Opportunities in AWS Partner Network (APN)
Follow these steps to request test opportunities in your Sandbox environment:
-
Log in to your AWS Partner Network (APN) account.
-
Navigate to Support in the top right corner and select "Contact Support."
- Click on Open New Case
-
Fill out the support case form with the following details:
- What type of support case would you like to open? → CRM Integration
- Type of request: → Request AWS action
- Please specify further: → Create test opportunities
- Subject: → Share test opportunities
-
Description: → Please share 10 test opportunities for the Sandbox environment in the v2 data model.
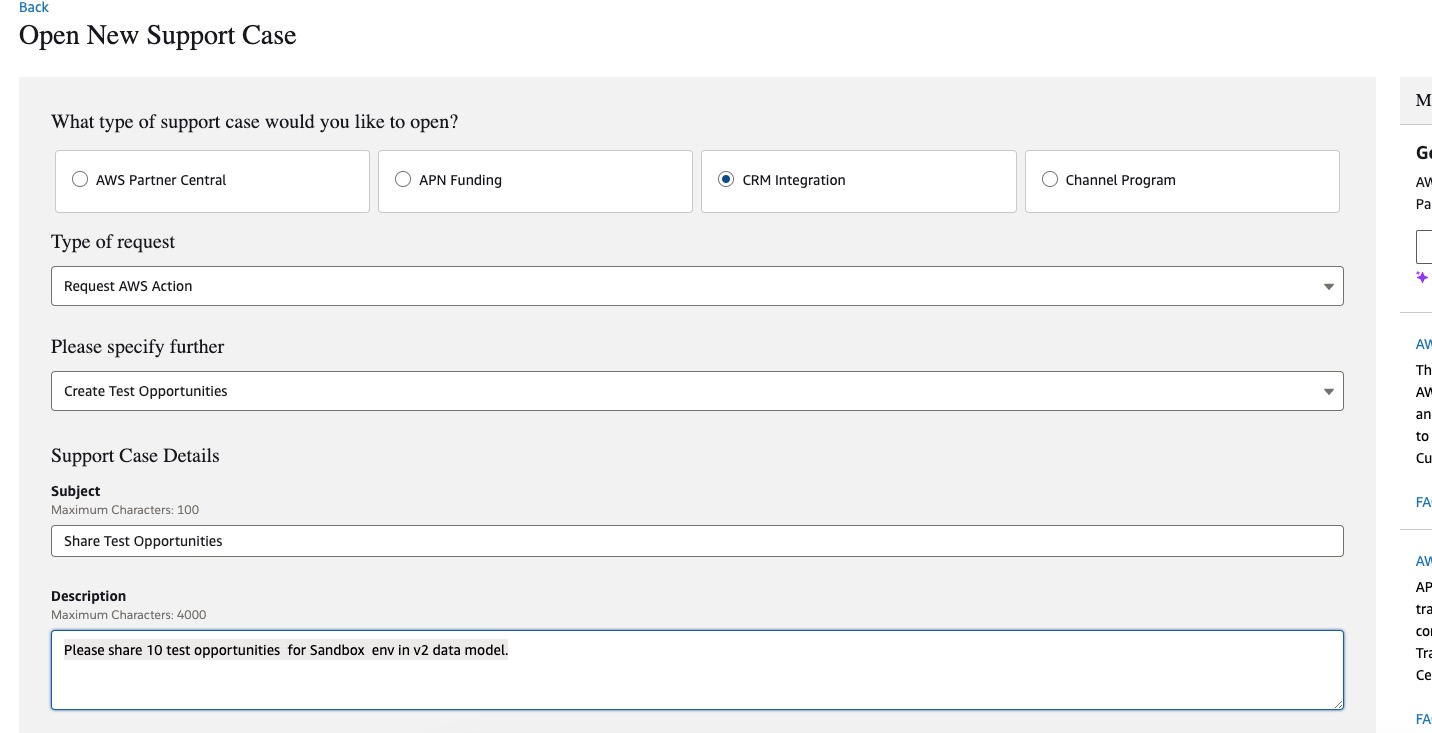
-
Submit the request by clicking "Submit case."
-
AWS typically processes the request within 24 hours, after which the test opportunities will be shared with you.
Technical Features and Configurations
What is the process for submitting opportunities from Salesforce to ACE?
To submit opportunities from Salesforce to ACE using Labra OppSync:
- Navigate to the opportunity in your Salesforce account.
- Ensure all mandatory fields required by AWS ACE are filled out in the opportunity record.
- Click on the “Submit to ACE” button enabled through Labra OppSync.
- Labra OppSync will push the opportunity to ACE and update its status in Salesforce once processed.
- If the opportunity is accepted, rejected, or needs further review, Labra OppSync will synchronize these updates from ACE back to Salesforce.
This streamlines the process by eliminating the need for manual data entry in ACE and ensuring data consistency across both platforms.
How does Labra OppSync ensure security during integrations?
Labra OppSync ensures security through:
-
- Role-based access control using IAM Roles. Customers grant permissions explicitly to Labra through IAM Role policies, ensuring Labra can only access the specified data.
- Encryption in transit and at rest to protect sensitive data during syncing.
- Regular security reviews and compliance with AWS best practices to safeguard user data.
- External IDs during IAM Role setup to prevent unauthorized cross-account access.
What permissions are required for Labra OppSync to function correctly?
Permissions depend on the features utilized but generally include:
- Read and write access to opportunities and lead data in Salesforce.
- Access to submit, update, and retrieve opportunities in AWS ACE.
- Permission to create and manage objects in S3 buckets for file storage if required.
- Additional permissions specified during the IAM Role setup process.
Labra works with your team to define and grant the minimum required permissions.
Support and Troubleshooting
What should I do if opportunities are not syncing between Salesforce and ACE?
If opportunities fail to sync, follow these steps:
- Verify that the required fields in Salesforce are correctly filled. Missing mandatory fields can cause errors.
- Check the status of the IAM Role used by Labra OppSync to ensure it is active and has the correct permissions.
- Confirm that there are no connectivity issues between Salesforce and ACE.
- Review Labra OppSync logs in Salesforce for error messages or contact Labra support for assistance.
How can I get support during or after onboarding?
Labra provides multiple support channels:
- Dedicated onboarding specialists who guide you through initial setup.
- Technical documentation and an onboarding portal with step-by-step guides.
- Post-onboarding technical support for troubleshooting.
- Quarterly health check-up calls with Labra’s customer success team to address any issues and ensure continued success.
Requesting Support in AWS Partner Central
If you need to raise a support ticket in AWS Partner Central, follow these steps:
1. Access the Support Portal
-
Click on Support in the top-right corner of the AWS Partner Central dashboard.
-
Select Contact Support from the dropdown menu.
2. Open a New Case
-
Under AWS Partner Support, click on the Open New Case button.
3. Fill Out the Support Case Form
This will open the Open New Support Case form, where you’ll need to provide the following details:
-
What type of support case would you like to open?
-
Options include AWS Partner Central, APN Funding, CRM Integration, Channel Program.
📒 Note: Selecting one will display additional options tailored to that category.
-
-
Type of request:
-
A dropdown menu will appear with specific case types based on your previous selection.
-
-
Please specify further:
-
This dropdown also updates dynamically based on the selected type of request.
-
-
Subject:
-
Keep it clear and concise to help AWS Support quickly understand the issue.
-
-
Description:
-
Provide key details relevant to your request, such as opportunity or deal IDs, product names, error messages, or any troubleshooting steps already taken. A well-detailed description ensures a smoother support process and faster resolution.
-
📎 Attaching Files
You can attach supporting files, such as screenshots or logs, by uploading or dragging and dropping them into the attachment bar at the end of the form. (Maximum file size: 3MB.)
4. Submit the Case
- Review all details for accuracy.
- Click Submit Case to finalize your request.
- Once submitted, AWS Support will follow up with further guidance.
Labra Features and Future Development
What enhancements are planned for Labra OppSync?
Labra is constantly evolving to meet customer needs. Planned enhancements include:
- Integration with additional CRM platforms beyond Salesforce.
- Improved reporting and analytics dashboards for opportunity tracking.
- Enhanced security features to align with the latest AWS and Salesforce standards.
- Features for bulk opportunity submission and advanced customization options.
Can I customize Labra OppSync to fit my business needs?
Yes, Labra OppSync allows customization such as:
- Customizing field mappings between Salesforce and ACE to match your internal data structure.
- Configuring specific workflows to automate processes unique to your business.
- Adjusting permissions and roles to ensure compliance with organizational policies.
Customization support is available during onboarding or via a request to Labra’s support team.
User and Role Management
Labra
How to add/delete users post-onboarding
- Select 'User management' in the 'Settings' dropdown on the left sidebar.
Click the orange 'Add user' button at the top, right corner.
- Add your team member's email and set a role for them (Staff or Admin). You can add several users at a time. Click on 'Invite' to send the account sign-in to the necessary users.
📒 Note: Users with an Admin role will be able to update/edit the account's settings, while Staff users will only be able to work on the platform's tasks. - To delete a user, click on the user you want to delete in the 'User management' tab.
- In the pop-up, click the 'Delete User' button on the bottom left corner.
AWS Partner Central
How to invite new users to AWS Partner Central
If you’d like to give your colleagues access to AWS Partner Central, you can invite them as new users. Only users with the Alliance Lead or Alliance Team roles have permission to invite others.
Steps to invite new users:
-
Sign in to AWS Partner Central using an account with the Alliance Lead or Alliance Team role.
-
From the My Company menu, select User Management.
-
On the User Management page, go to the Partner Central roles tab.
-
Click Invite users.
-
Enter the email address of the user you want to invite.
-
If you enter an invalid email address, you’ll see an error message.
-
-
Select one or more roles to assign to the user.
-
For details about available roles, see AWS Partner Central roles.
-
-
(Optional) To invite additional users, click Add Another User and repeat the above steps.
-
When finished, click Invite.
The invited users will receive an email with a registration link to complete their account setup.